
Bread is seen as one of the ultimate challenges for the amateur cook. It's something that we take for granted, but forms so central a part of our daily diet that even the slightest change can cause consternation. It is no accident that Jesus used it as a metaphor for food and that, in English at least, the word is a synonym for money, that other essential for sustenance. When I was living in Tuscany, I discovered that the local bread was made without salt and, to my palate brought up on salted English loaves, was simply unpalatable. Thankfully, someone had given me a Panasonic breadmaker a few years before, with which we were able to make delicious English bloomers!
Recently, I have started baking bread without the benefit of a machine which, unfortunately, takes a lot longer but is delicious. You can make good bread dough in a mixer with a dough hook very quickly, but there is a lot of waiting around for the dough to rise. But if you plan a morning or evening around it, you can have delicious, freshly baked bread on a daily basis.
I started with a recipe for a basic white loaf which is a good one to begin with and to learn the techniques before moving onto experiment with different flours and ingredients.
The recipe I use has five ingredients:
300ml of tepid water
5g of dried yeast
560g of white flour
10g of sea salt
20ml of oil
You can use any oil. The original recipe used rapeseed oil, but I prefer to use extra virgin olive oil.
Start with the yeast. Dissolve it in the water. If the water is of the right temperature it should feel neutral when you put your hand in it. Leave it for ten minutes to start working and you should be left with a frothy liquid. If not, then the yeast hasn't worked and you should throw it away and start again.
Then mix the salt in with the flour. You want to try and keep the salt away from direct contact with the yeast as it will retard it. Then add the oil and the yeast mixture and work it with your hands into a dough.
Next comes the kneading. This can be done in a mixer with a dough hook in which case it is ready when it clings to the dough hook and the bowl is clean. However, I think that anyone who is serious about making bread should do it by hand a few times to get a feeling for the process. After a few minutes of kneading the quality of the dough changes and the surface becomes soft and slightly silky. Keep going for about 10 minutes and you will be left with a tight soft ball which bounces back when pressed with a finger.
Transfer the dough to a clean bowl which has been rubbed with olive oil and wrap tightly with clingfilm. Then put it in a warm place for about an hour to prove. This is the process by which the yeast will make the dough grow to about twice the size it was before. I warm the oven to the lowest temperature, (50 degrees) and then turn it off and leave the bowl inside.
When it has proved, remove the dough from the bowl and hit it with your hand. All the air will leave and it will return to its original size, but don't worry, this is correct. The dough will feel different again now though: much looser and more pliable.


Shape the dough into a loaf and place it in a loaf tin, which has been rubbed with oil. Cover it again, and place in a warm place for another hour. During this time it will double in size again, so make sure that there is room beneath the cover for this to happen. Instead of clingfilm, I use a plastic bag for this to ensure that the dough can rise out of the top of the tin.

Heat the oven to 220 degrees and place a backing tray at the bottom. When the loaf has risen, cut the top with a sharp knife once or twice, creating slashes. Then sprinkle with flour and place in the oven. Before you shut the oven door, take a glass of cold water and through it into the baking tray at the bottom of the oven. This will create steam which produces a nice crust on the bread.


After 30 minutes, remove the loaf from the oven. Knock the bottom of the tin. If it sounds hollow, then the loaf is cooked. Leave it in the tin for a few minutes to cool and then turn it out onto a wire rack to cool fully. And voilà, white bread!

Recently, I have started baking bread without the benefit of a machine which, unfortunately, takes a lot longer but is delicious. You can make good bread dough in a mixer with a dough hook very quickly, but there is a lot of waiting around for the dough to rise. But if you plan a morning or evening around it, you can have delicious, freshly baked bread on a daily basis.
I started with a recipe for a basic white loaf which is a good one to begin with and to learn the techniques before moving onto experiment with different flours and ingredients.
The recipe I use has five ingredients:
300ml of tepid water
5g of dried yeast
560g of white flour
10g of sea salt
20ml of oil
 |
| Bread ingredients |
You can use any oil. The original recipe used rapeseed oil, but I prefer to use extra virgin olive oil.
Start with the yeast. Dissolve it in the water. If the water is of the right temperature it should feel neutral when you put your hand in it. Leave it for ten minutes to start working and you should be left with a frothy liquid. If not, then the yeast hasn't worked and you should throw it away and start again.
 |
| The bubbles show that the yeast has started working |
 |
| Mix the salt with the flour to keep it away from the yeast |
Next comes the kneading. This can be done in a mixer with a dough hook in which case it is ready when it clings to the dough hook and the bowl is clean. However, I think that anyone who is serious about making bread should do it by hand a few times to get a feeling for the process. After a few minutes of kneading the quality of the dough changes and the surface becomes soft and slightly silky. Keep going for about 10 minutes and you will be left with a tight soft ball which bounces back when pressed with a finger.
 |
| Dough after kneading |
Transfer the dough to a clean bowl which has been rubbed with olive oil and wrap tightly with clingfilm. Then put it in a warm place for about an hour to prove. This is the process by which the yeast will make the dough grow to about twice the size it was before. I warm the oven to the lowest temperature, (50 degrees) and then turn it off and leave the bowl inside.
 |
| Before ... |
 |
| ... and after one hour |
When it has proved, remove the dough from the bowl and hit it with your hand. All the air will leave and it will return to its original size, but don't worry, this is correct. The dough will feel different again now though: much looser and more pliable.


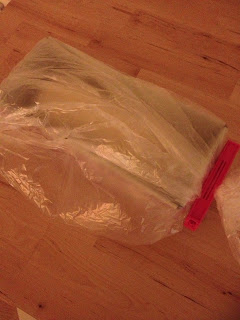
Shape the dough into a loaf and place it in a loaf tin, which has been rubbed with oil. Cover it again, and place in a warm place for another hour. During this time it will double in size again, so make sure that there is room beneath the cover for this to happen. Instead of clingfilm, I use a plastic bag for this to ensure that the dough can rise out of the top of the tin.


Heat the oven to 220 degrees and place a backing tray at the bottom. When the loaf has risen, cut the top with a sharp knife once or twice, creating slashes. Then sprinkle with flour and place in the oven. Before you shut the oven door, take a glass of cold water and through it into the baking tray at the bottom of the oven. This will create steam which produces a nice crust on the bread.


After 30 minutes, remove the loaf from the oven. Knock the bottom of the tin. If it sounds hollow, then the loaf is cooked. Leave it in the tin for a few minutes to cool and then turn it out onto a wire rack to cool fully. And voilà, white bread!

No comments:
Post a Comment